How to Automatically Log Wise Transactions in Google Sheets
If you use Wise for multi-currency transactions, you might want to keep track of your account activity in real time. Wise provides webhooks that notify you whenever your account is credited or debited. With Hooksy, you can capture these webhook events and log them directly into Google Sheets—no coding required.
In this guide, we'll show you how to:
- Set up a Wise webhook to trigger when your balance is updated.
- Use Hooksy to forward the transaction data to Google Sheets.
#Step 1: Create a Google Sheet
First, create a Google Sheet where you want to store your Wise transactions. You don't need to set up the columns right away, as you may not know what kind of data will be sent via the webhook event.
Hooksy provides an auto-mapping feature to help with this.
However, if you prefer to set up the columns manually, you can refer to Wise's webhook documentation for guidance on available data fields.
#Step 2: Get a Webhook URL from Hooksy
- Sign in to your Hooksy account.
- Make sure you have connected your Google Sheets account. You can refer to the documentation for guidance on how to do this.
- Click Create Webhook.
- Choose Custom as the source tool.
- Select Google Sheets as the destination.
- Hooksy will generate a unique webhook URL — copy it.

#Step 3: Set Up a Webhook in Wise
- Log in to your Wise account.
- Click on your account avatar from the right-top corner of the screen, which will take you to your Account details. Then under Settings, click on Integrations and tools > Webhooks > Create a new webhook.
- Or, you can click this link here — Create a Webhook (on Wise).
- On the Create a Webhook page, add a Name, paste the webhook URL from Hooksy.
- Under Subscribed events, select Balance deposit events.
- Before saving, trigger a test event to ensure that Wise can successfully send a sample payload to Hooksy.
- Once the test is successful, save the webhook.

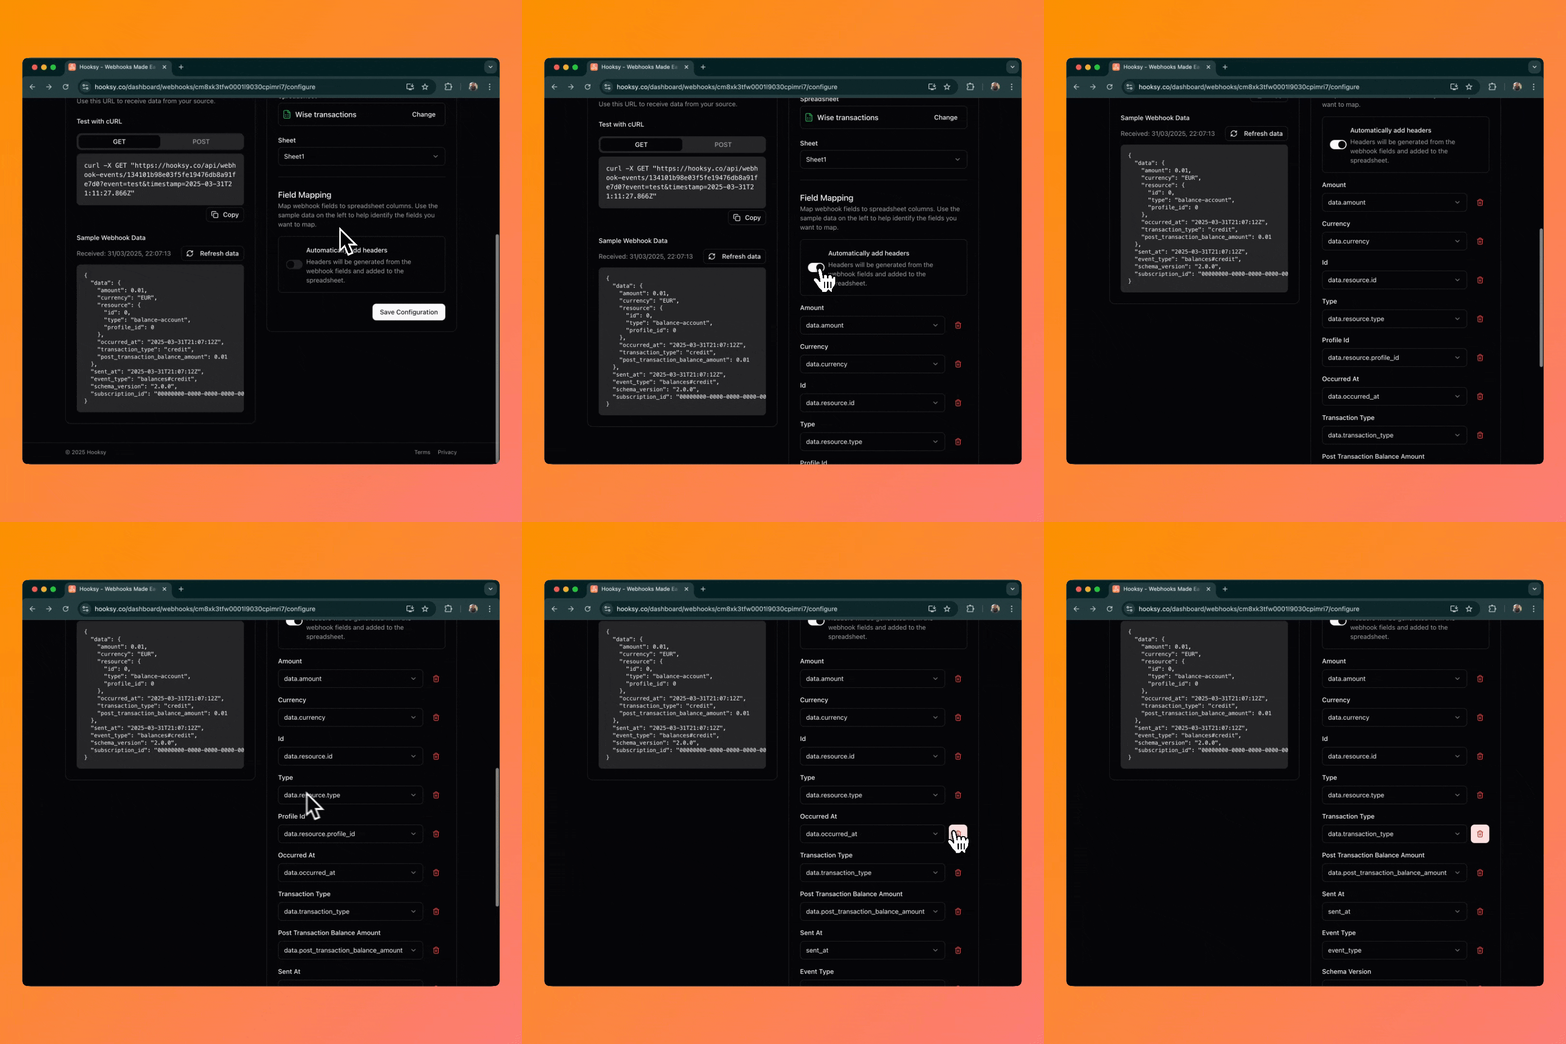
#Step 4: Map the Data Fields in Hooksy
- On Hooksy's webhook configuration page, from Source Configuration, under Sample Webhook Data, click on Refresh data.
- If you haven't set up columns manually in your Google Sheet, use Hooksy's auto-mapping feature to automatically match incoming Wise data fields to your sheet.
- Click Save Configuration.

#Step 5: Test the Webhook
- Add money to your Wise balance or make a test transaction.
- Wise should send an event to Hooksy.
- Hooksy will forward the data to your Google Sheet.
- Check your Google Sheet to verify the transaction was logged.
#Conclusion
With Hooksy, you can automate Wise transaction tracking without writing a single line of code. Anytime your Wise balance is updated, the data will appear in Google Sheets instantly. This is perfect for finance tracking, reconciliation, or just staying on top of your money movements in real time.
Ready to set up your webhook? Get started with Hooksy today!